How to Get Paid:
Invoicing your Customers through CorrigoPro
Table of Contents
Slides 4 and 5 - CorrigoPro Invoice
Slides 6 and 7 - Invoice Statuses / Customer / Filter
Slides 8 thru 13 - Creating a Single Invoice / Required Data
Slide 14 thru 16 - Attaching Documents / Work Order Completion
Details/ Work Order Print Out
Slides 17 and 18 - Bulk Import Template
Slides 19 and 20 - Importing Invoices
Slide 21 - Submitting Imported Invoices
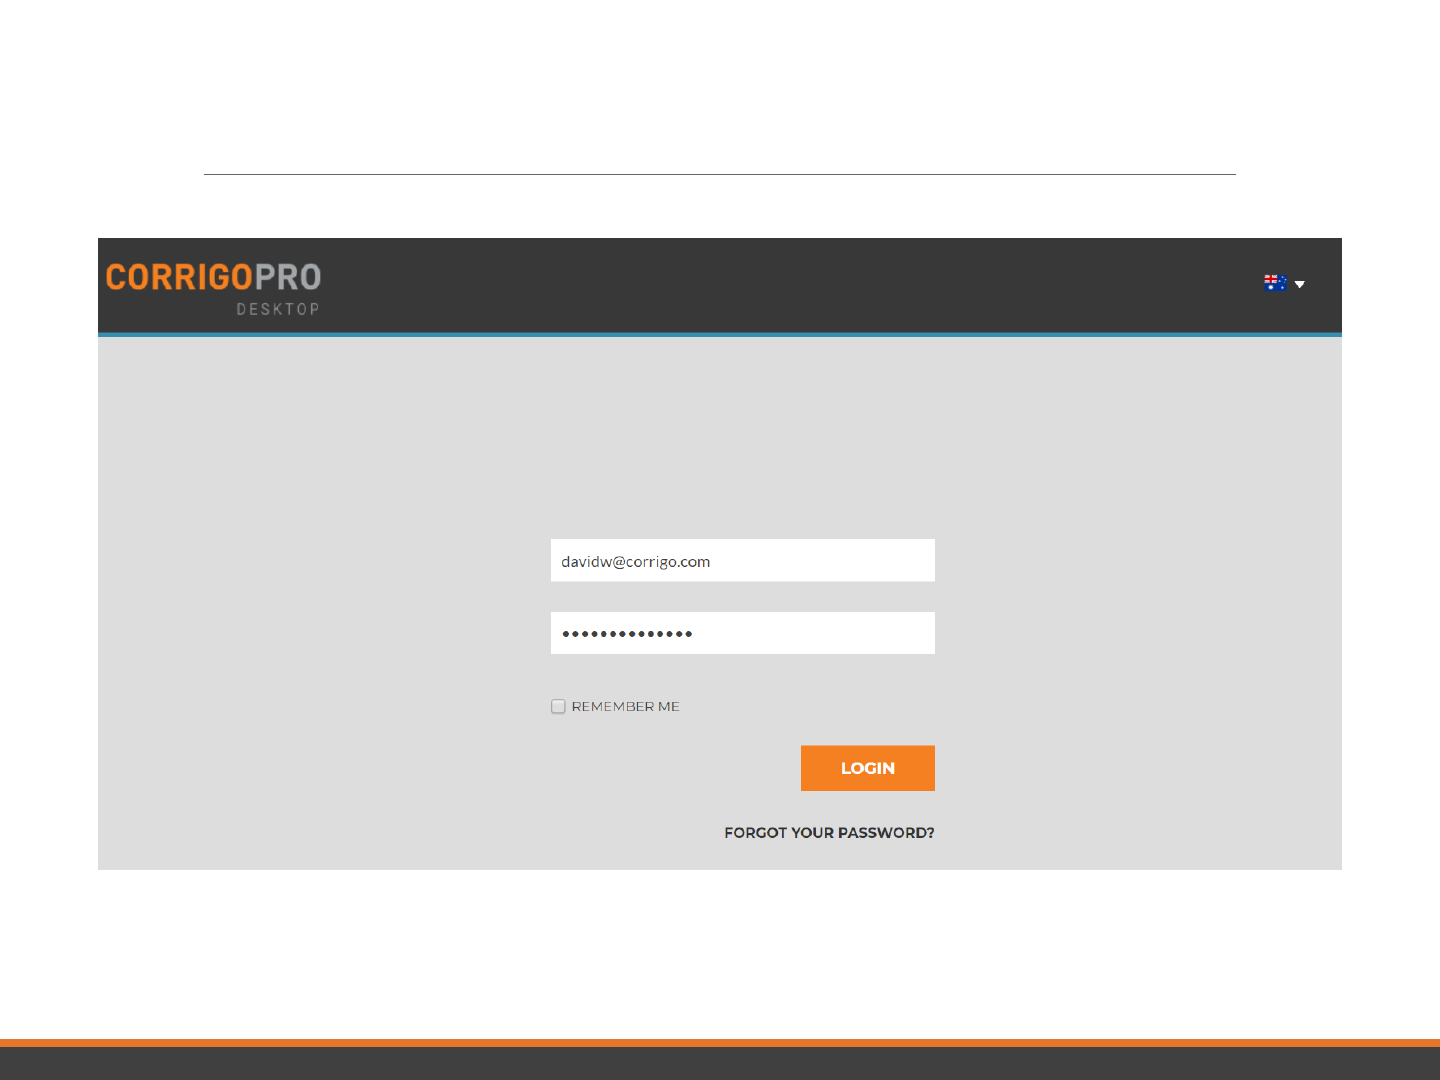
CorrigoPro Desktop Login
Type in your email address and password
to login to CorrigoPro
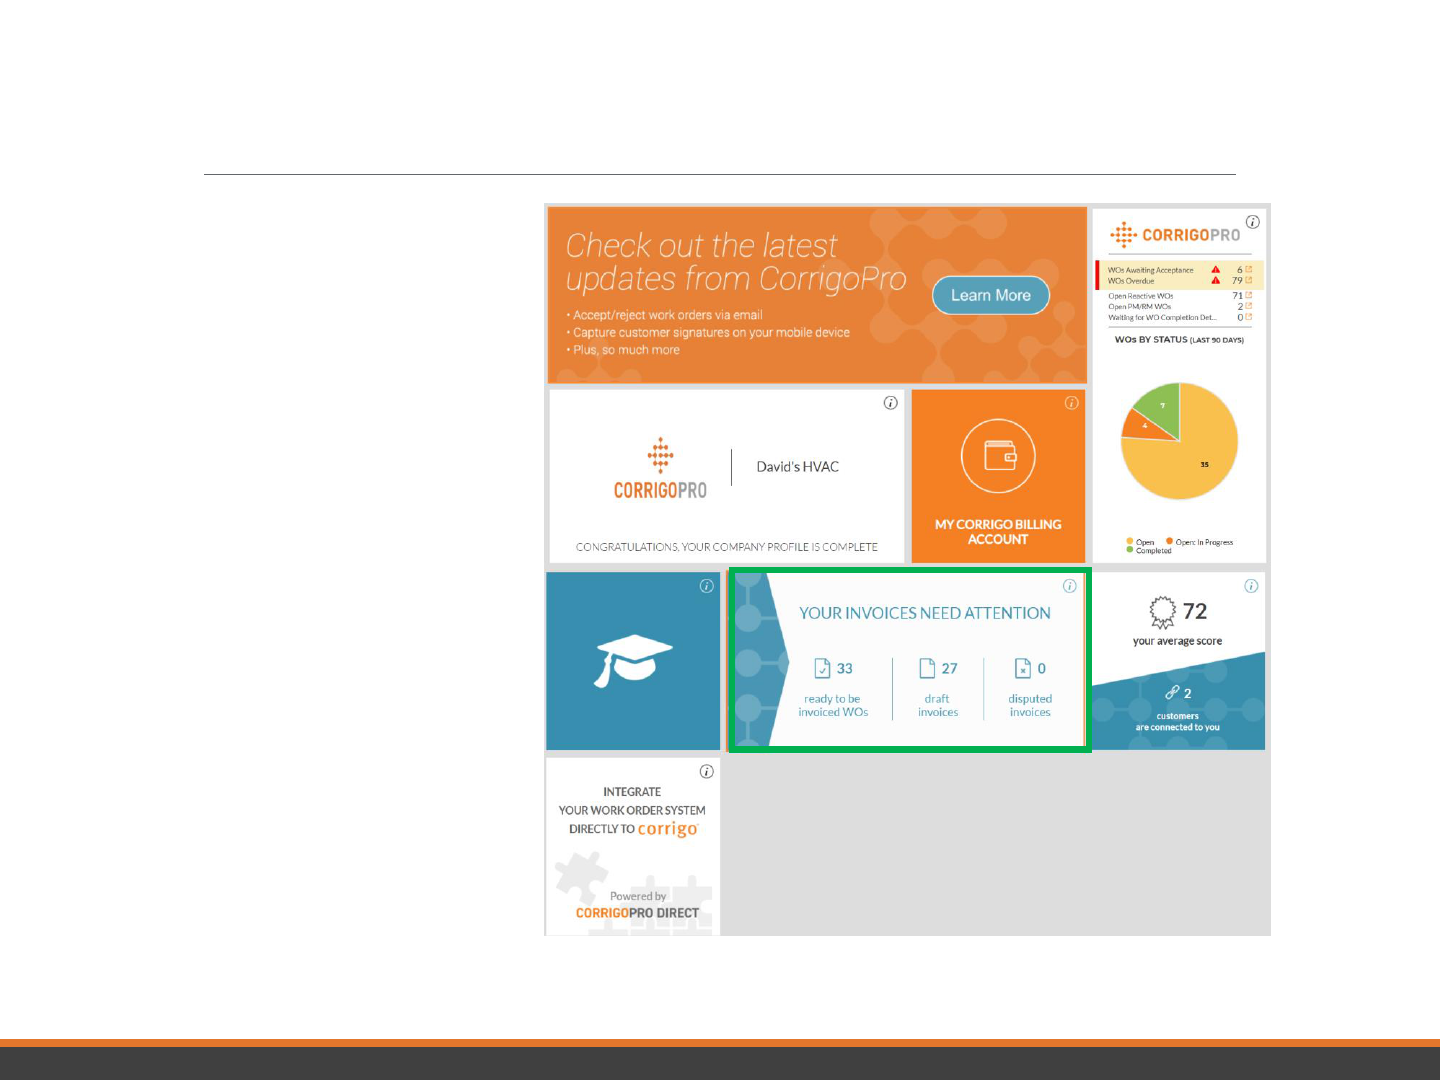
CorrigoPro Invoicing Tile
Only ADMIN USERS will be
able to see and access the
Invoicing Tile
Click on the Invoicing tile to
open the Invoicing App
within CorrigoPro Desktop
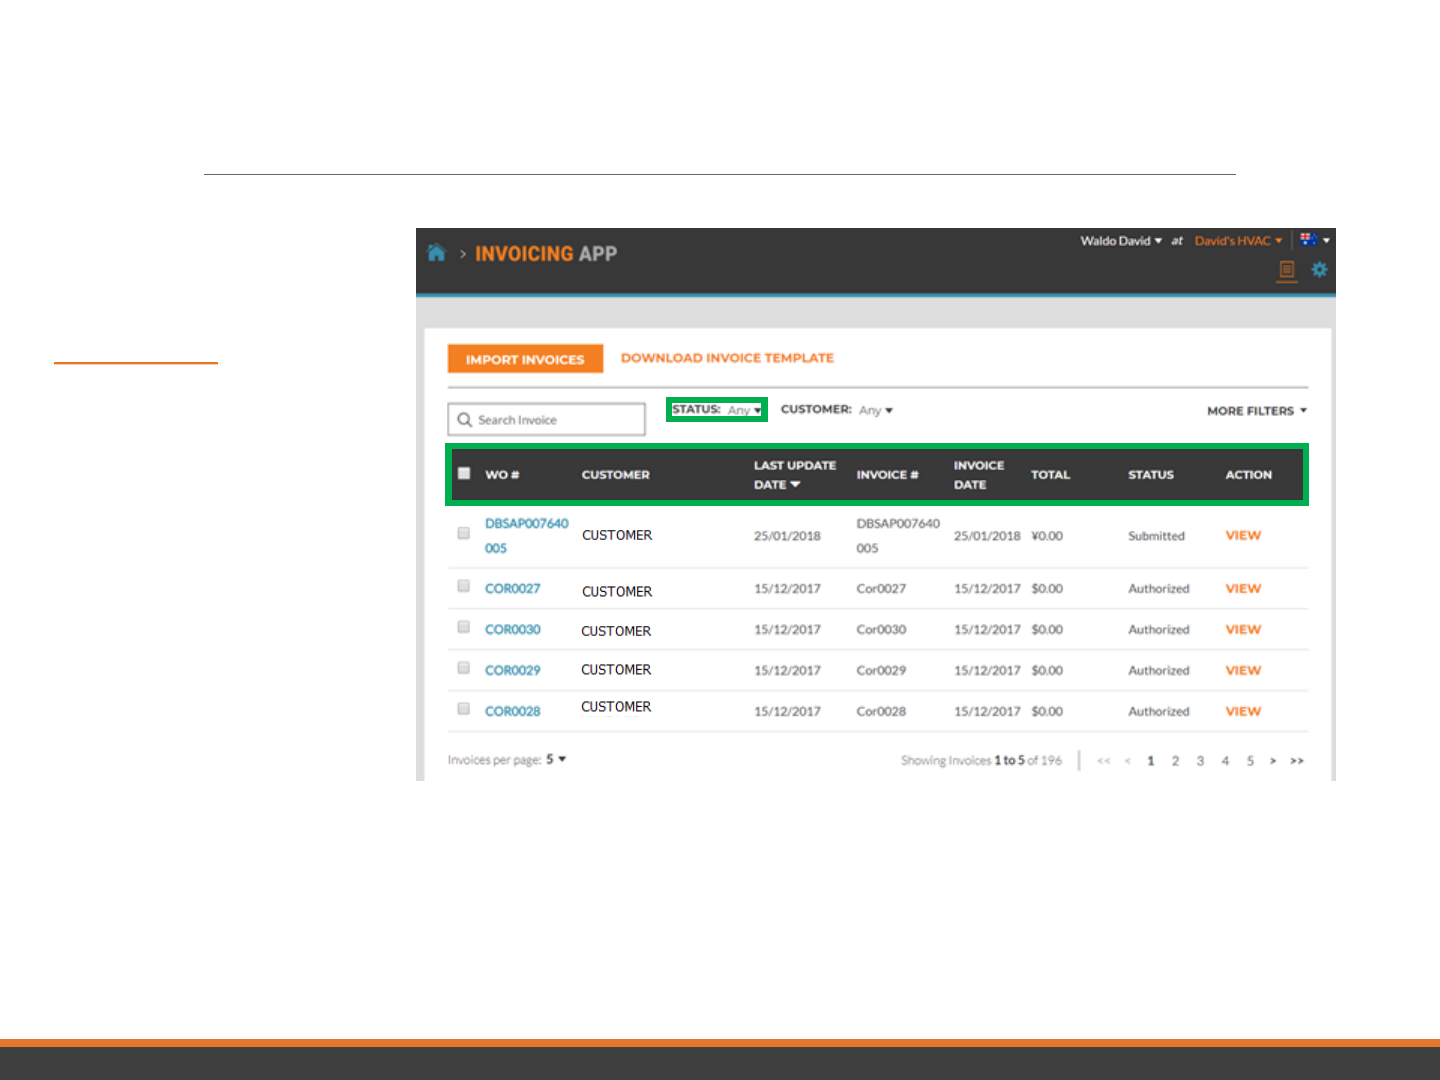
Invoicing App
Data Fields
• WO#
• Customer
• Last date Updated
• Invoice #
• Invoice Date
• Total
• Status
• Action
• Search function allows
you to search by WO#
or Invoice#
Click on “Status”
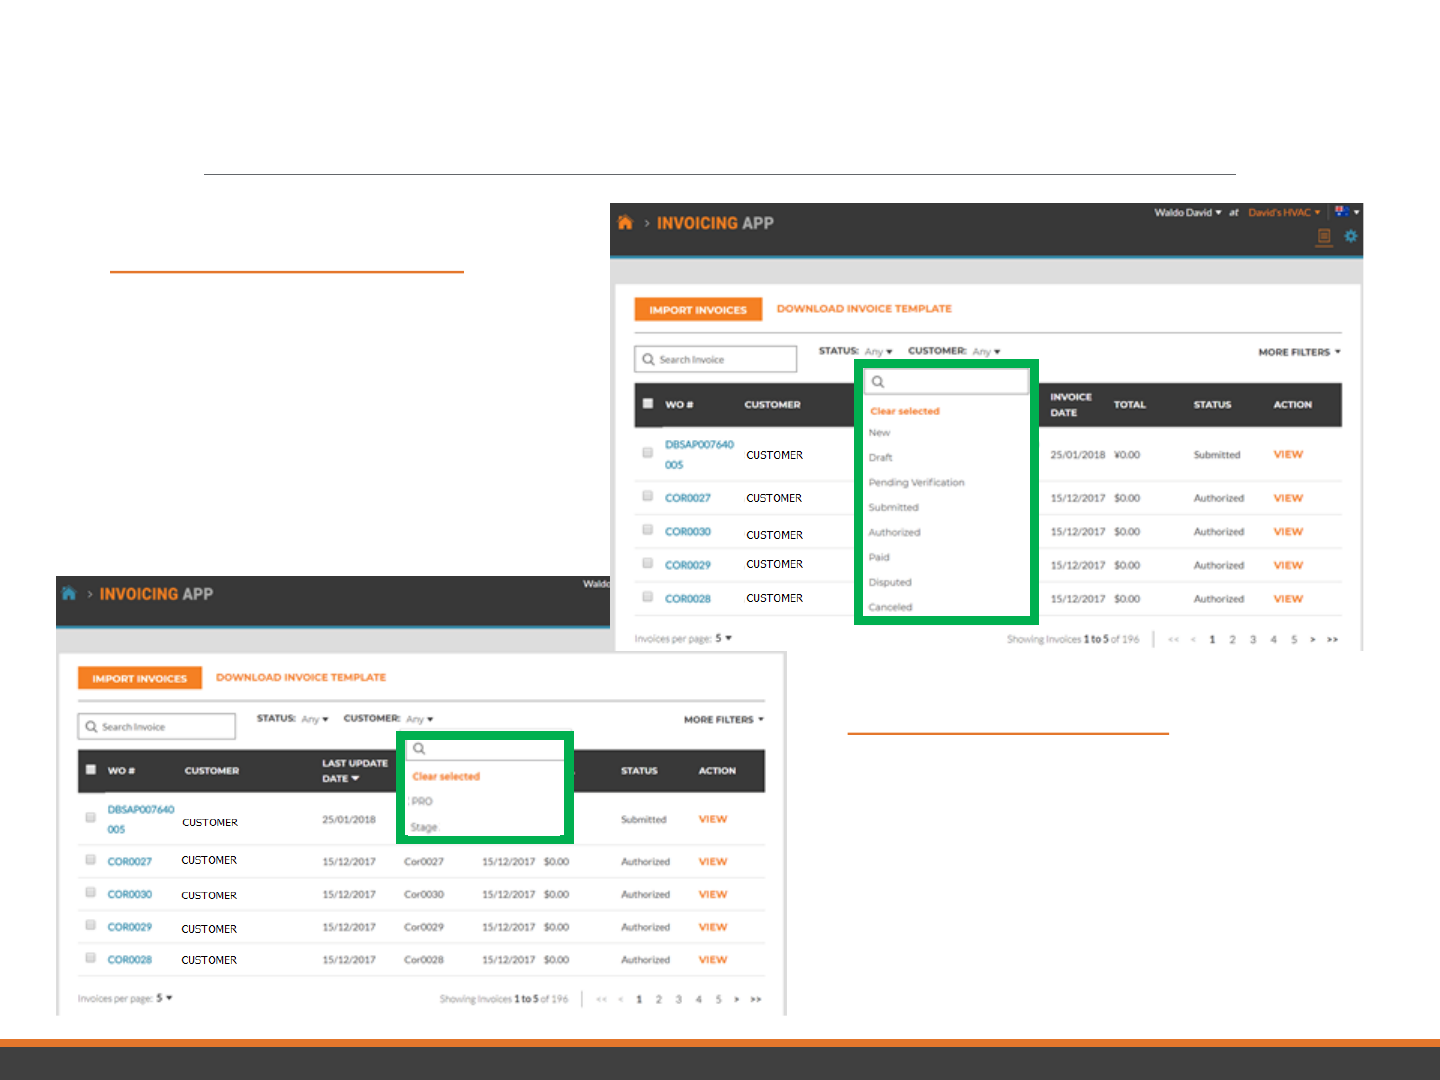
Invoicing App: Status / Customer
Status Drop Down View
• Place a check to the right of the
invoice status you wish to view
• Can view more than one status
at a time
• Click “Clear selected” to view all
invoices
Customer Drop Down
• View all customers or place a
check to the right of the specific
customer you wish to view
• Click “Clear selected” to view all
customers
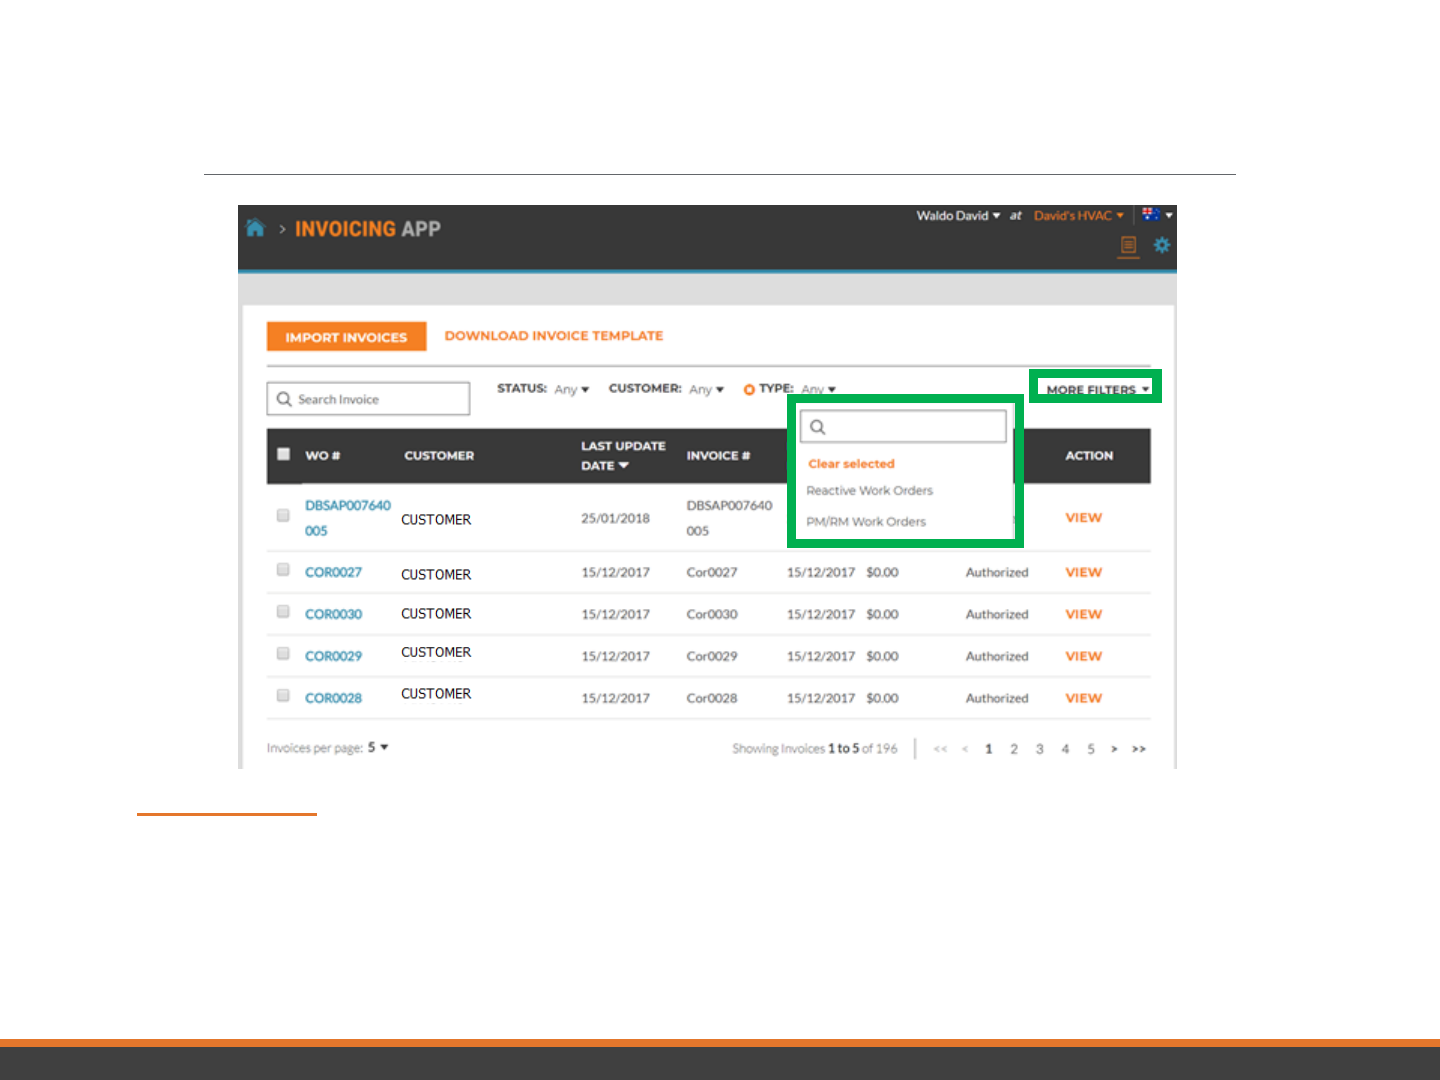
Invoicing App: More Filters
More Filters
• Gives you the option of viewing invoices by Invoice Date, Last Update and invoice Type
• Click on “TYPE” to view invoices for Reactive Work Orders or PM/RM Work Orders
• Click “Clear selected” to view all invoices
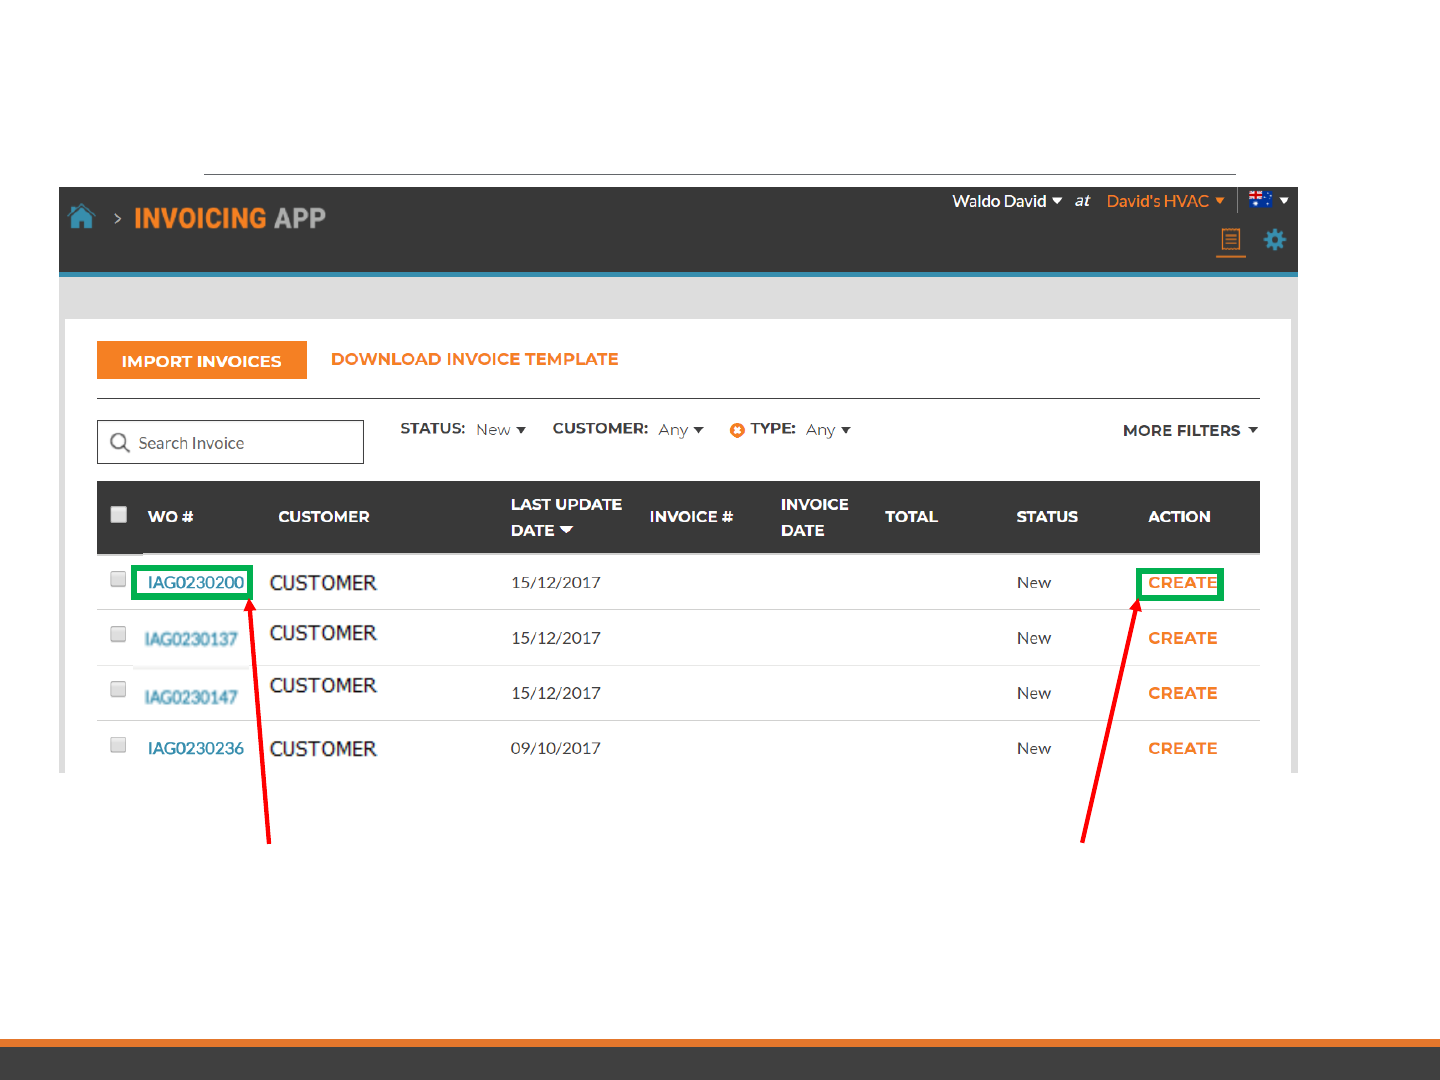
Invoicing App: Creating / Viewing a
Single Invoice
• Click on the WO# to view
the details of the work order
• Click on “Create” to open the
desired invoice
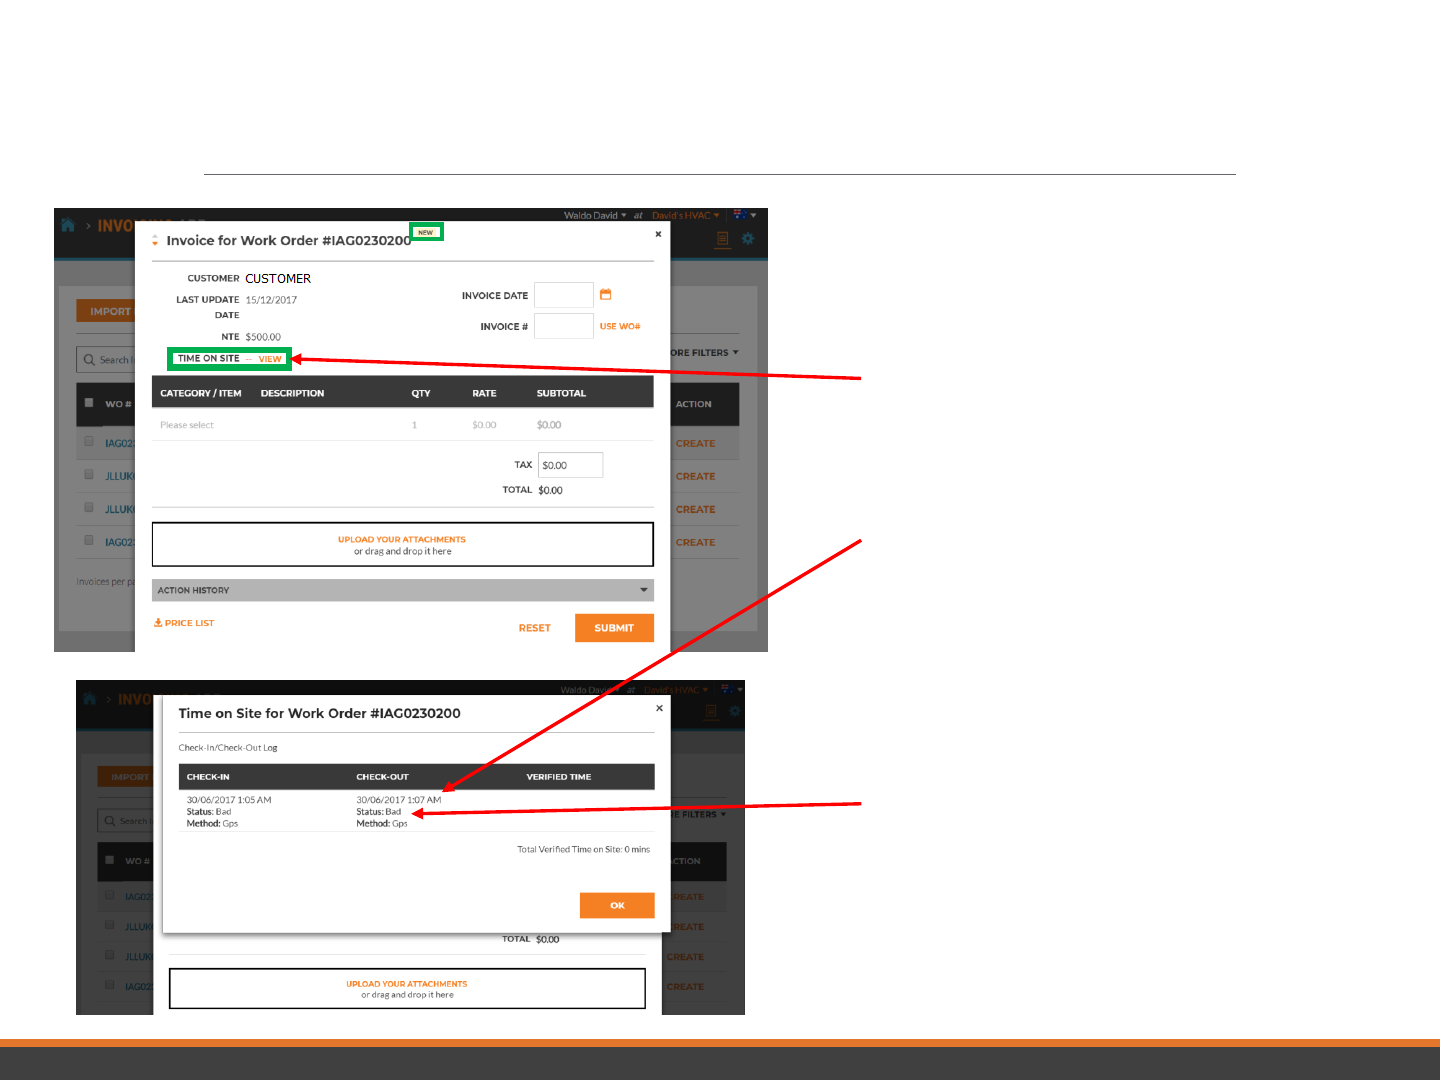
Invoicing App: Time on Site
Once you click “Create”, you will see
your invoice template
• Click on “TIME ON SITE” to see
how much time was spent
providing this service
• Check in and Check out times are
recorded
• GPS location is ONLY recorded for
Check in / Check Out
• The status is set to “Bad” if not
within set distance from location
• It is set to “Good” if within that set
distance
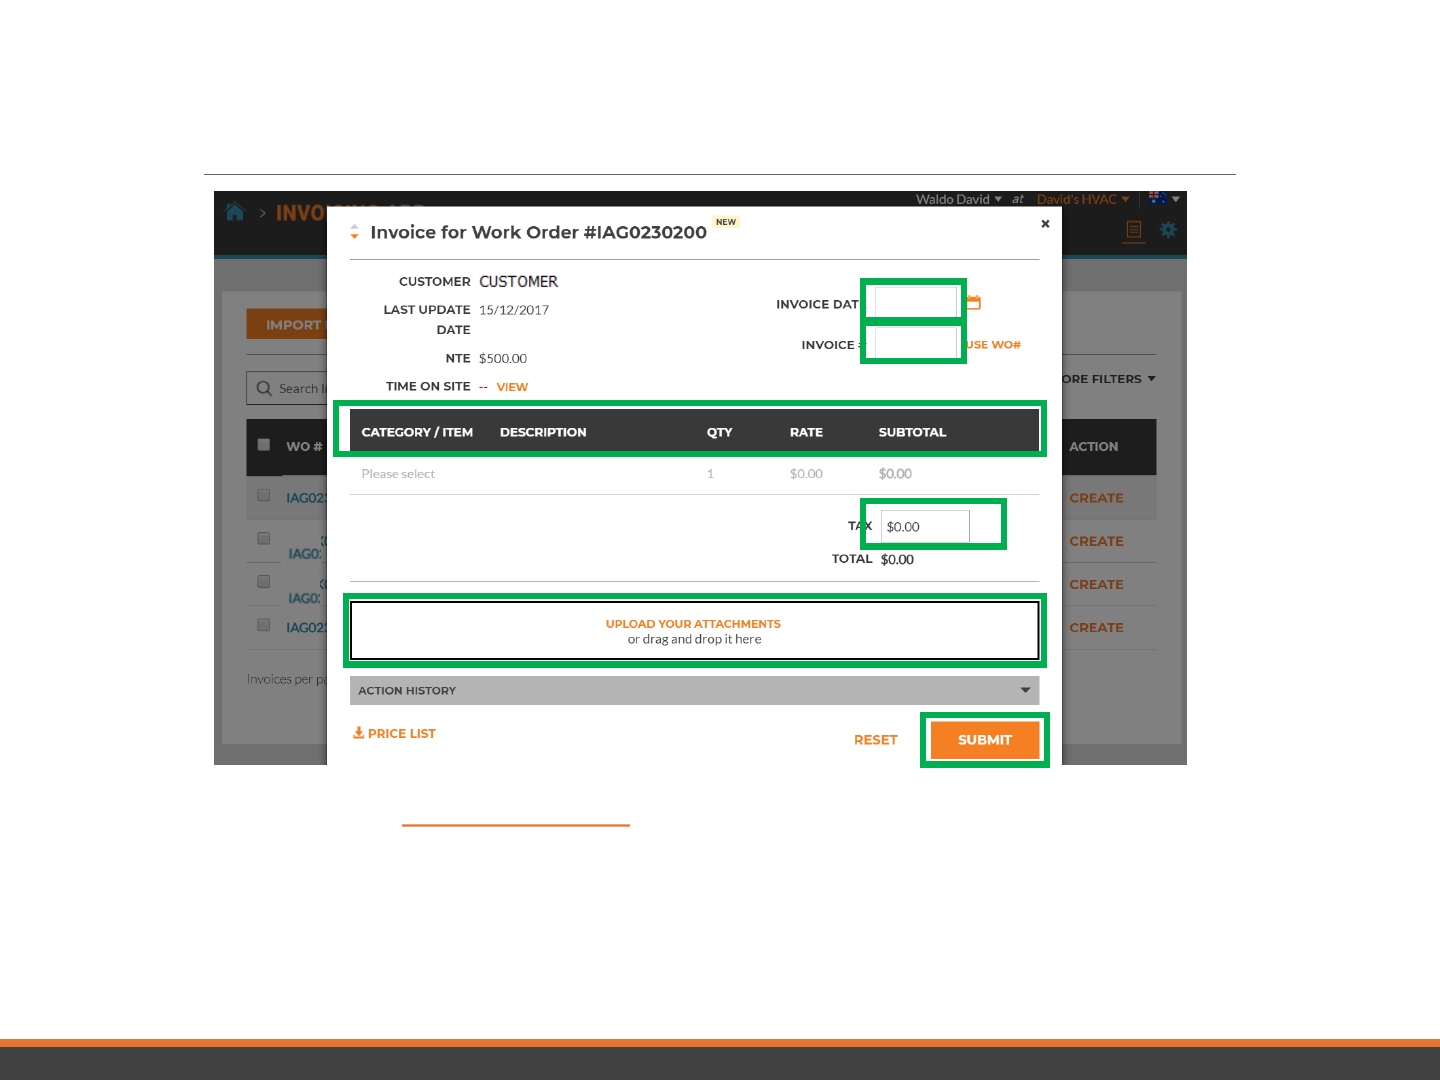
Invoicing App: Required Data fields
Required Fields
• Invoice date
• Invoice Number
• Category/Item | Description | QTY | Rate | Subtotal
• Tax (If applicable)
• Uploading Attachments is optional
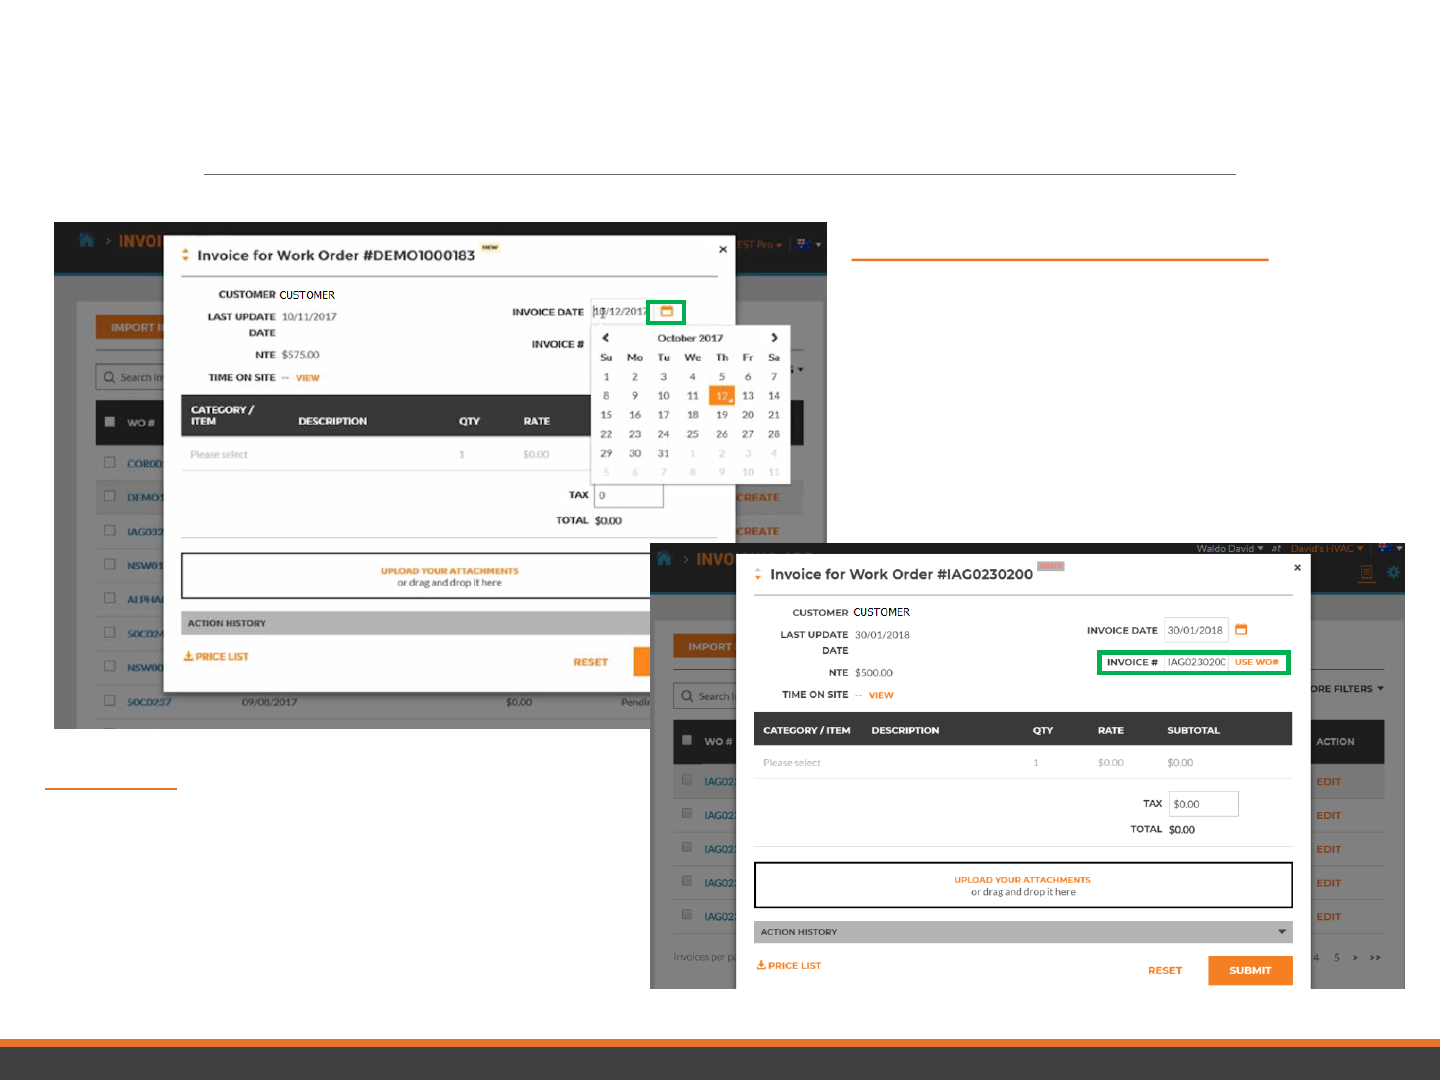
Invoicing Data Field: Date / Invoice Number
Click on the “Calendar” icon
• Click on the date you wish to use for
this invoice
• The date will populate in the date
field
• Forward and back arrows will allow to
customize the desired date used
Invoice #
• By clicking on the “Use WO#” you can
use the WO# as the invoice #
• Customize your invoice # by typing in
the desired number you wish to use –
Please DO NOT copy and paste into
this field
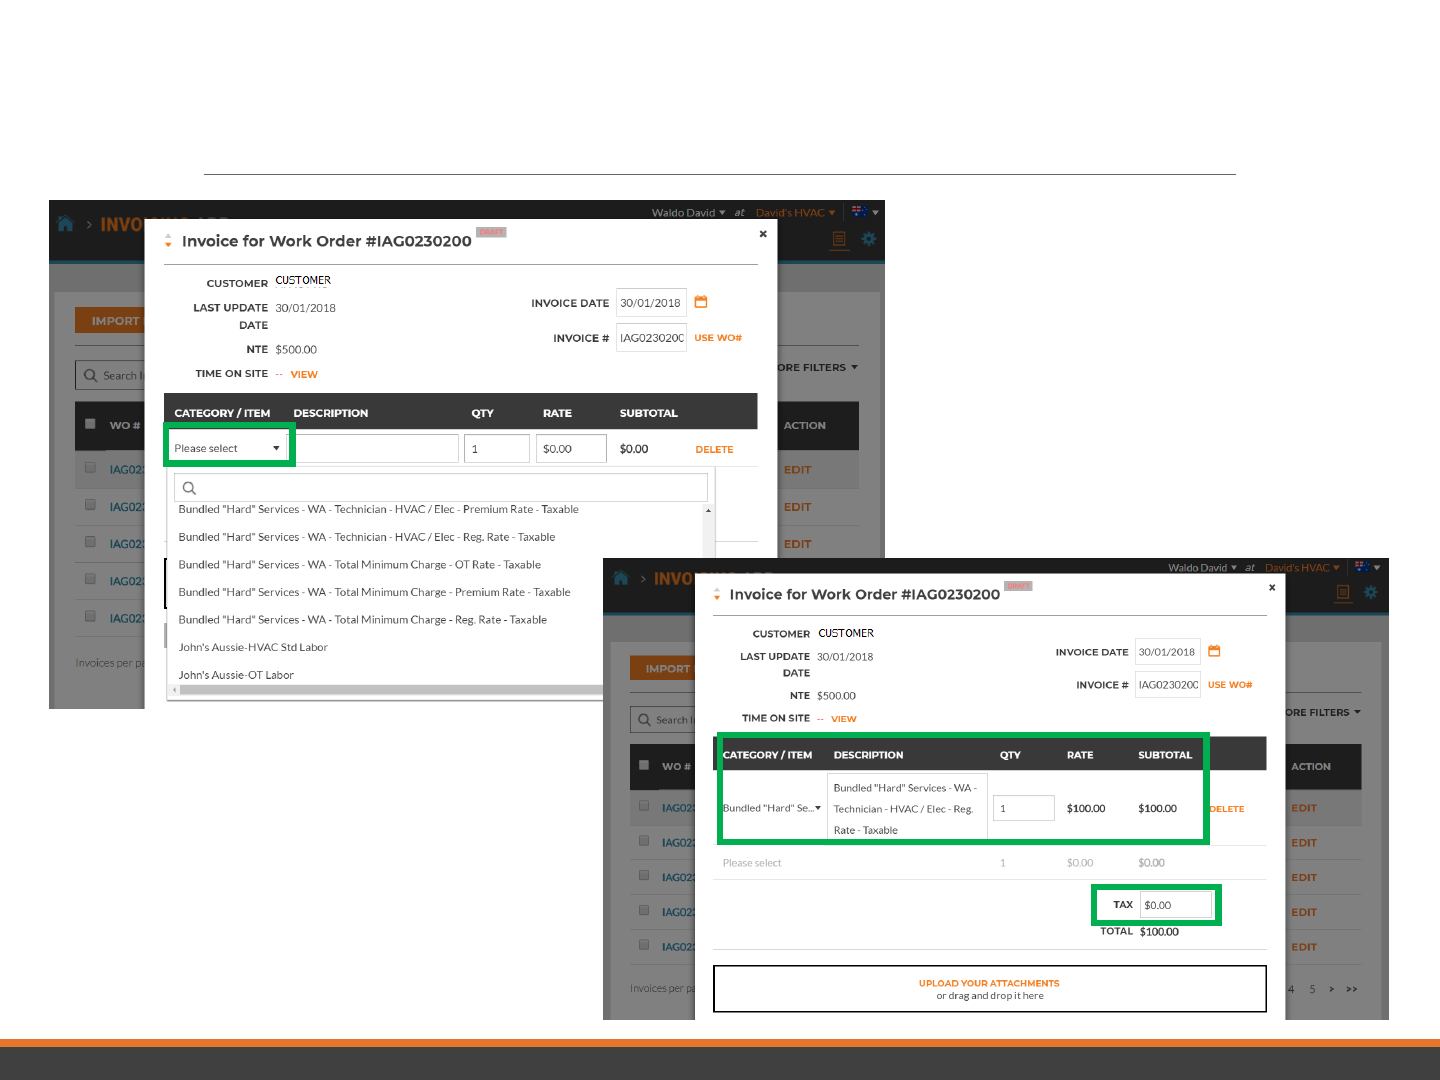
Invoicing App: Required Data Fields / Itemize Invoice
• Click under “CATEGORY / ITEM” to
open the text box
• If a rate card is used, select services
from the items provided
• If no rate card is being used, select
from Labor/ Materials Parts/
Misc./Shipping/Services
• If rate card is used Category/ Item,
Description, and Rate will auto-
populate – QTY should be added
• Manually populate invoice if using
Labor/Material Parts/Mics/Shipping/
Services
• Tax has to be manually populated
Invoicing App: Required Data Fields /
Itemize Invoice
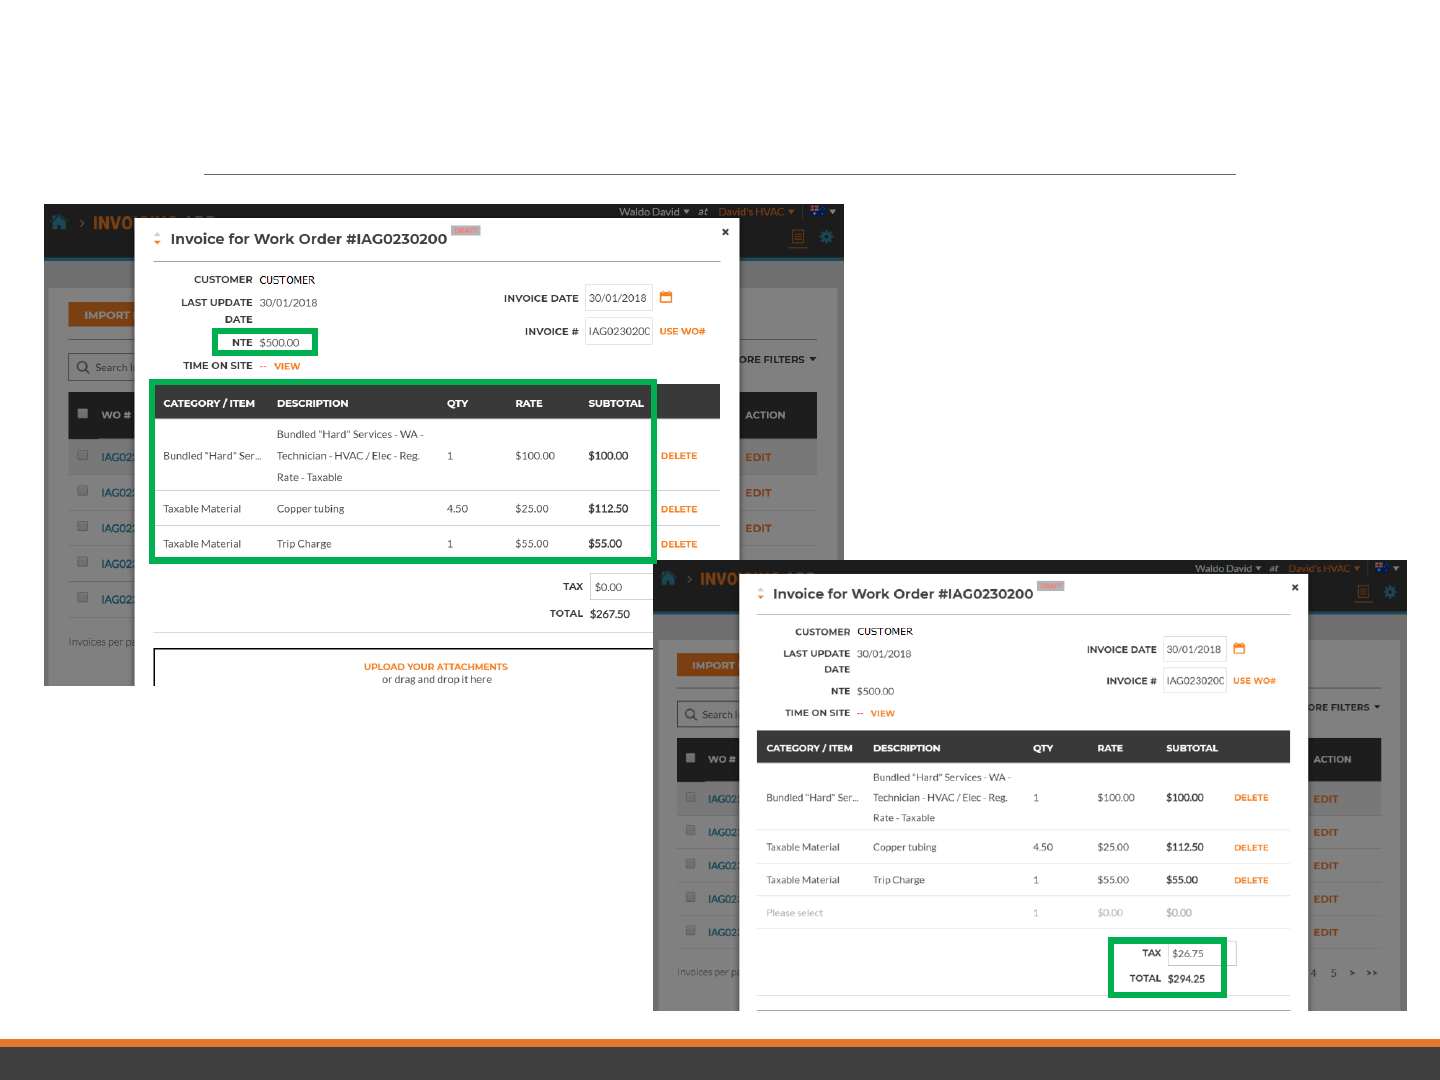
• NTE is the maximum amount that an
invoice can be submitted for, in this
case the NTE is $500
• NTE is tax inclusive
• Add as many items as needed in the
invoice
• Description field is free text up to 1140
characters
• Once you have a total, taxes can
be calculated and applied
• The total will be auto populated
Invoicing App: Attaching Documents
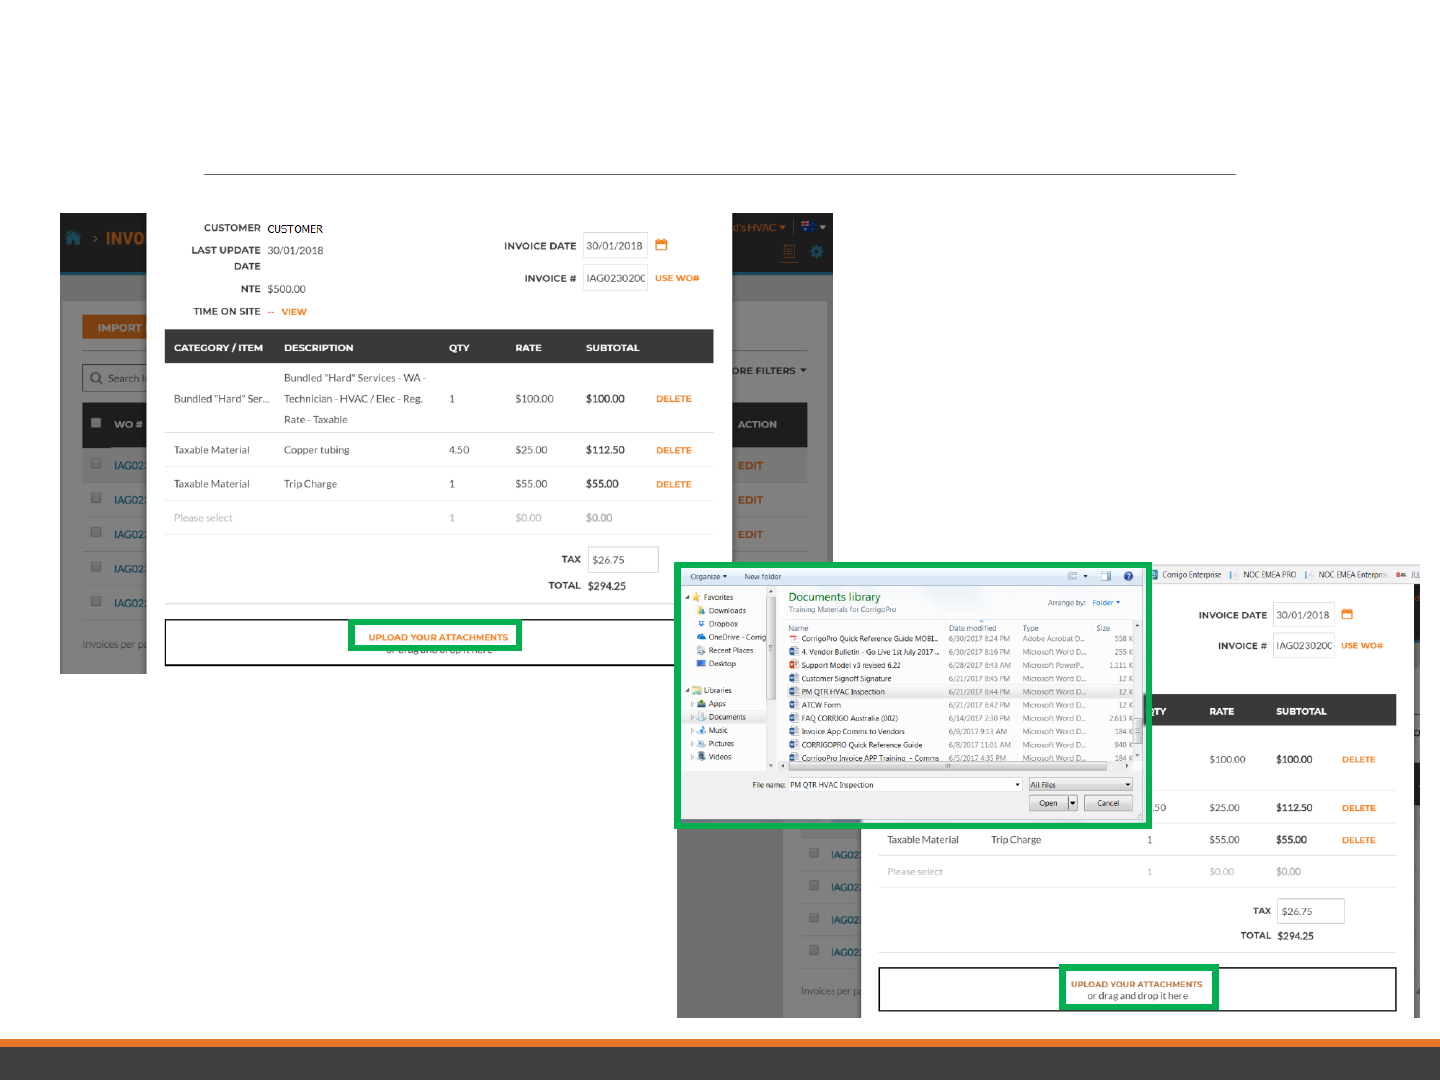
To attach a document click on
“UPLOAD YOUR ATTACHMENTS”
• The system will take you to your
computer’s document library
• Click on the file you wish to attach or
you can drag and drop the file into
your invoice
• Attach as many files as needed
Invoicing App: Work Order Completion Details
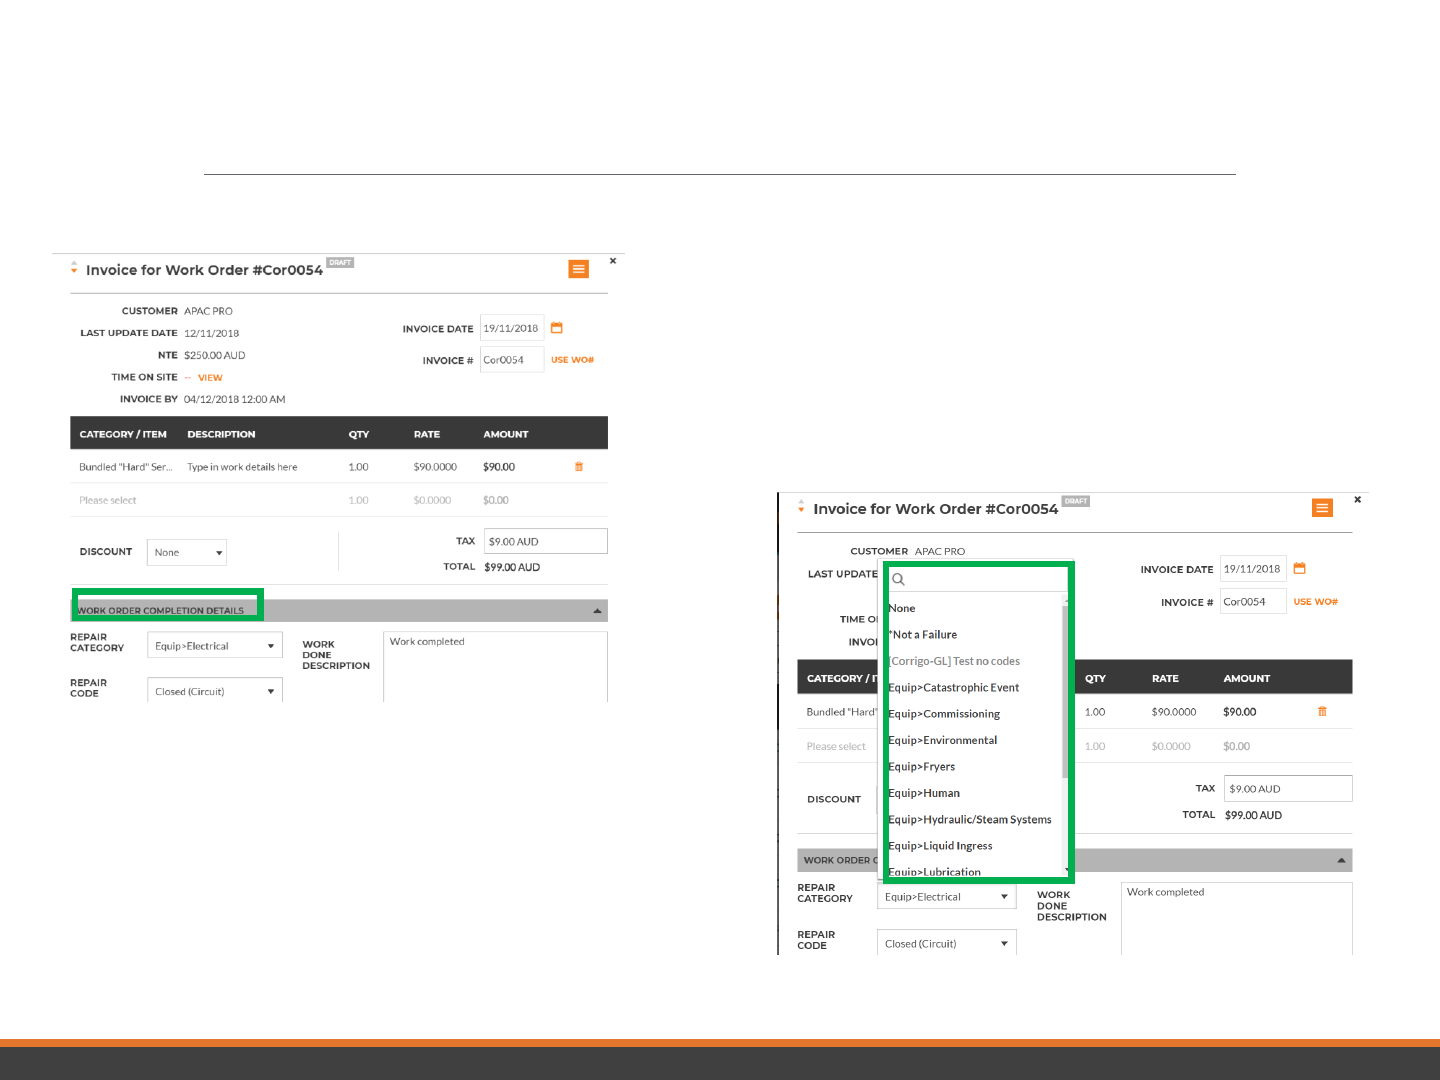
Work order completion
details can be added in the
invoice by clicking on “WORK
ORDER COMPLETION
DETAILS”
Click on “REPAIR
CATEGORY and “REPAIR
CODE” to add in the details
Type work order form drop
down box
Type completion details in
text box
Invoicing App: Work Order Print Out
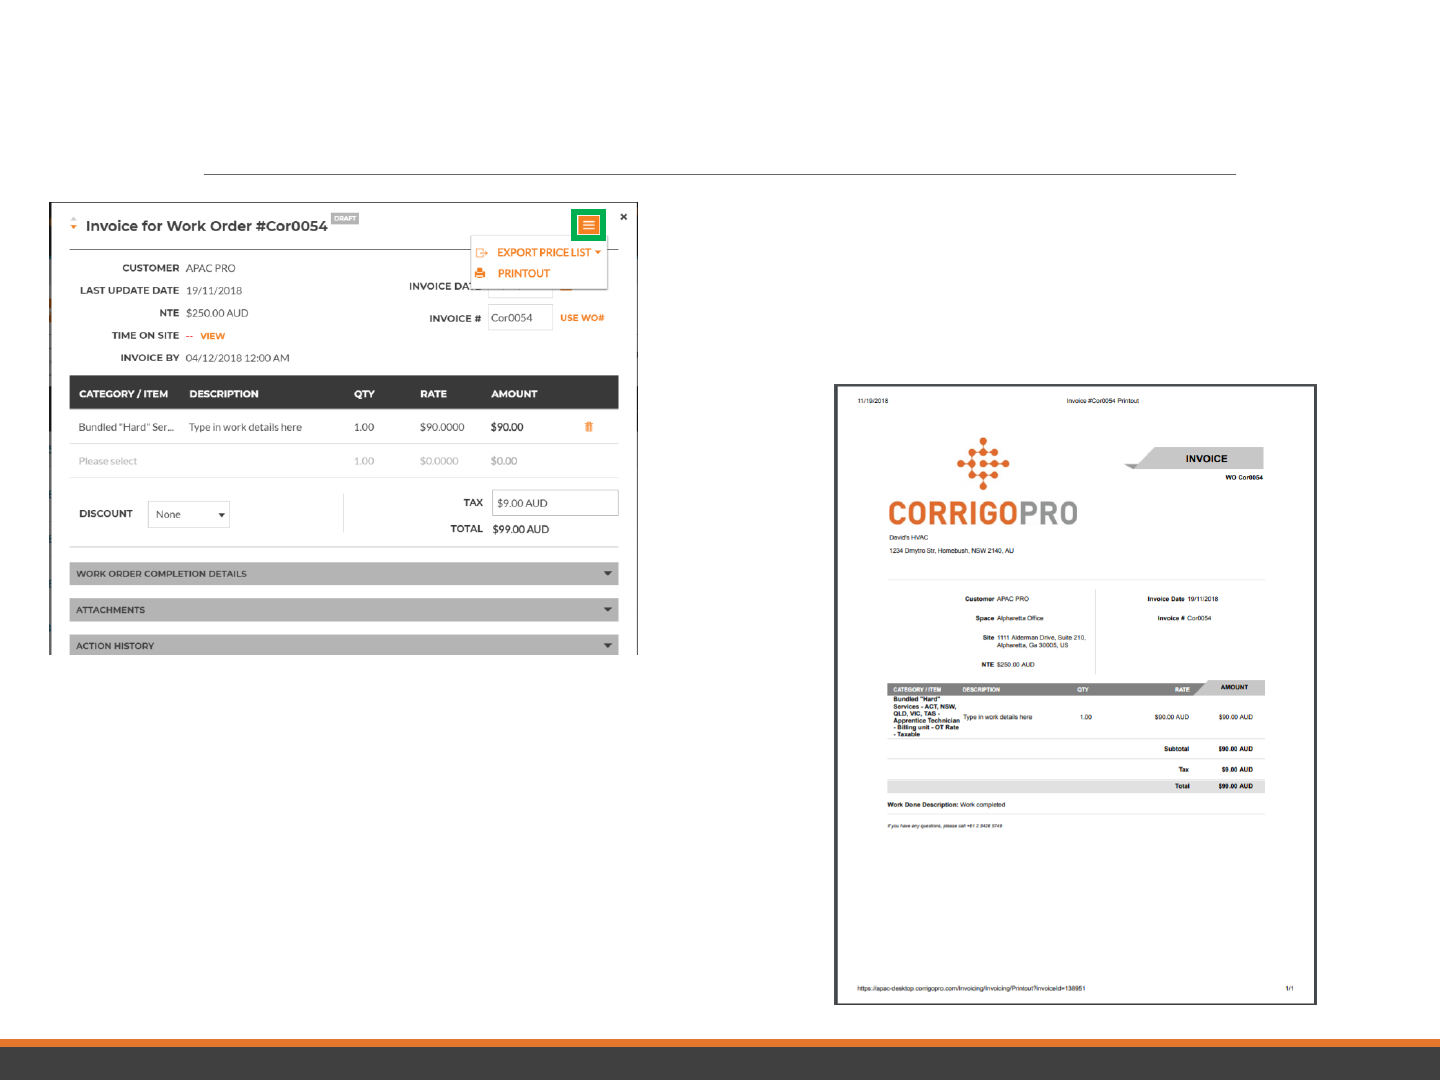
Open an invoice
Click on orange drop down
box to print out invoice
Print out invoice as needed
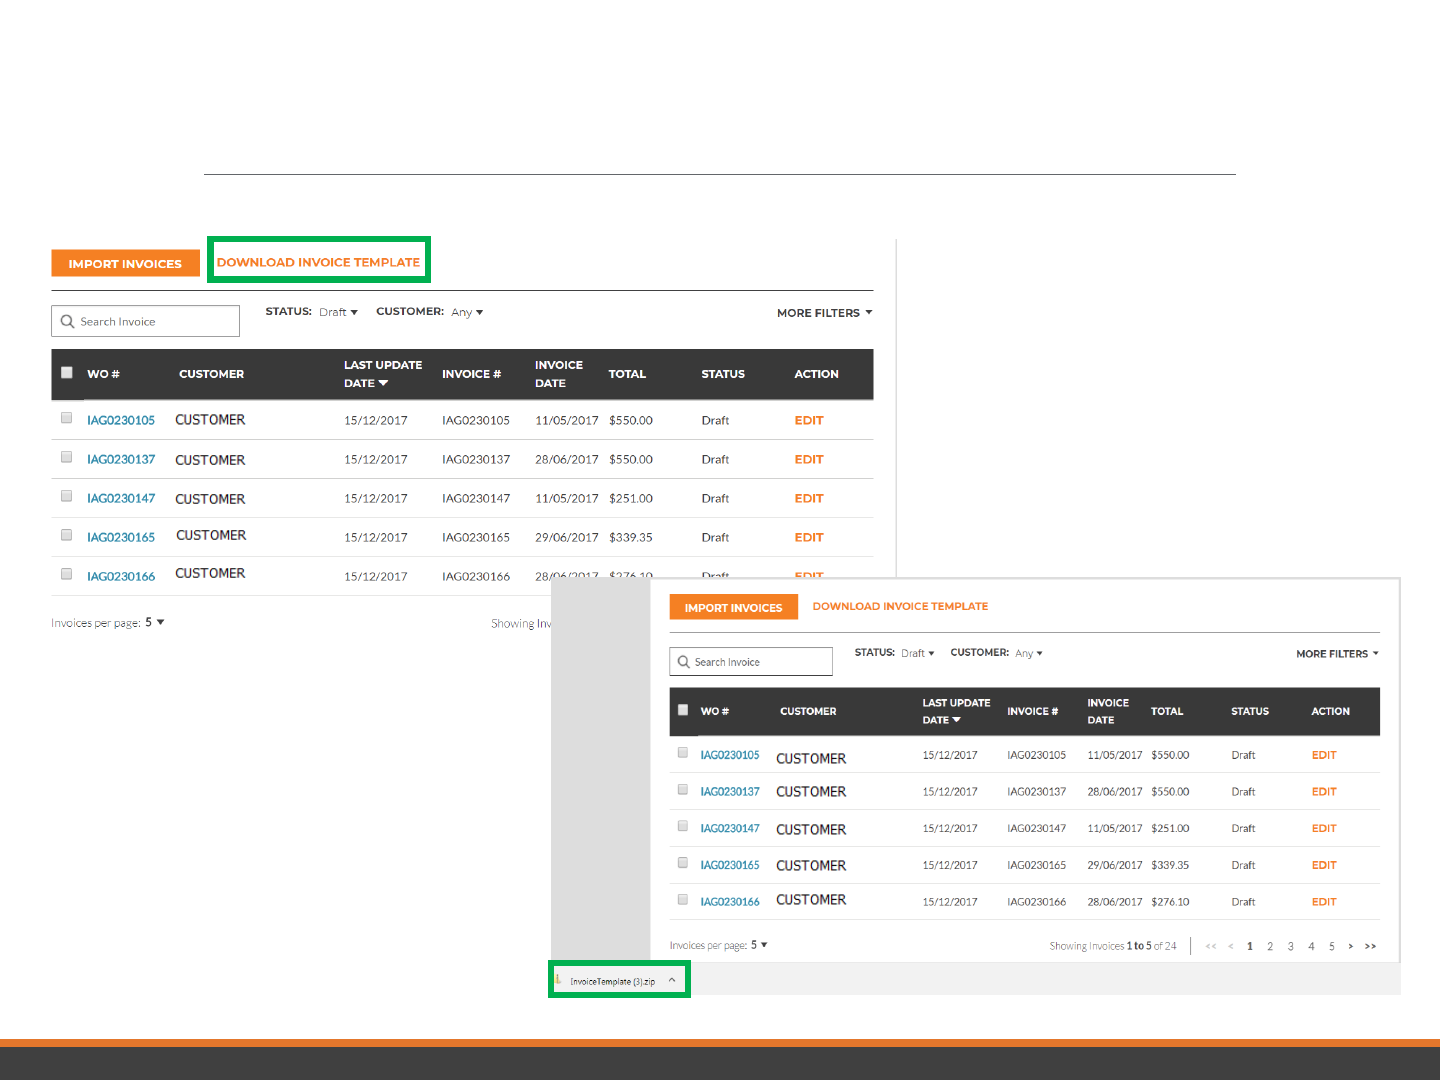
Invoicing App: Bulk Invoice Import Template
• To import multiple invoices at
one time you will need to use
the Invoice Template
• Click on “DOWNLOAD INVOICE
TEMPLATE”
• The “Invoice Template” will
appear in the lower left
hand corner of your screen
• Click to open the template

Invoicing App: Bulk Invoice Import Template
• You need to fill in the required data
fields above
• DO Not ADD any additional fields to the
template
Things to Remember
✓ If rate card is being used, Category/Item
must match rate card
✓ When itemizing, dates must match
✓ Invoice has to be within NTE
✓ Taxes must be applied
• Click on the “Help” tab to view details
for filling out the template
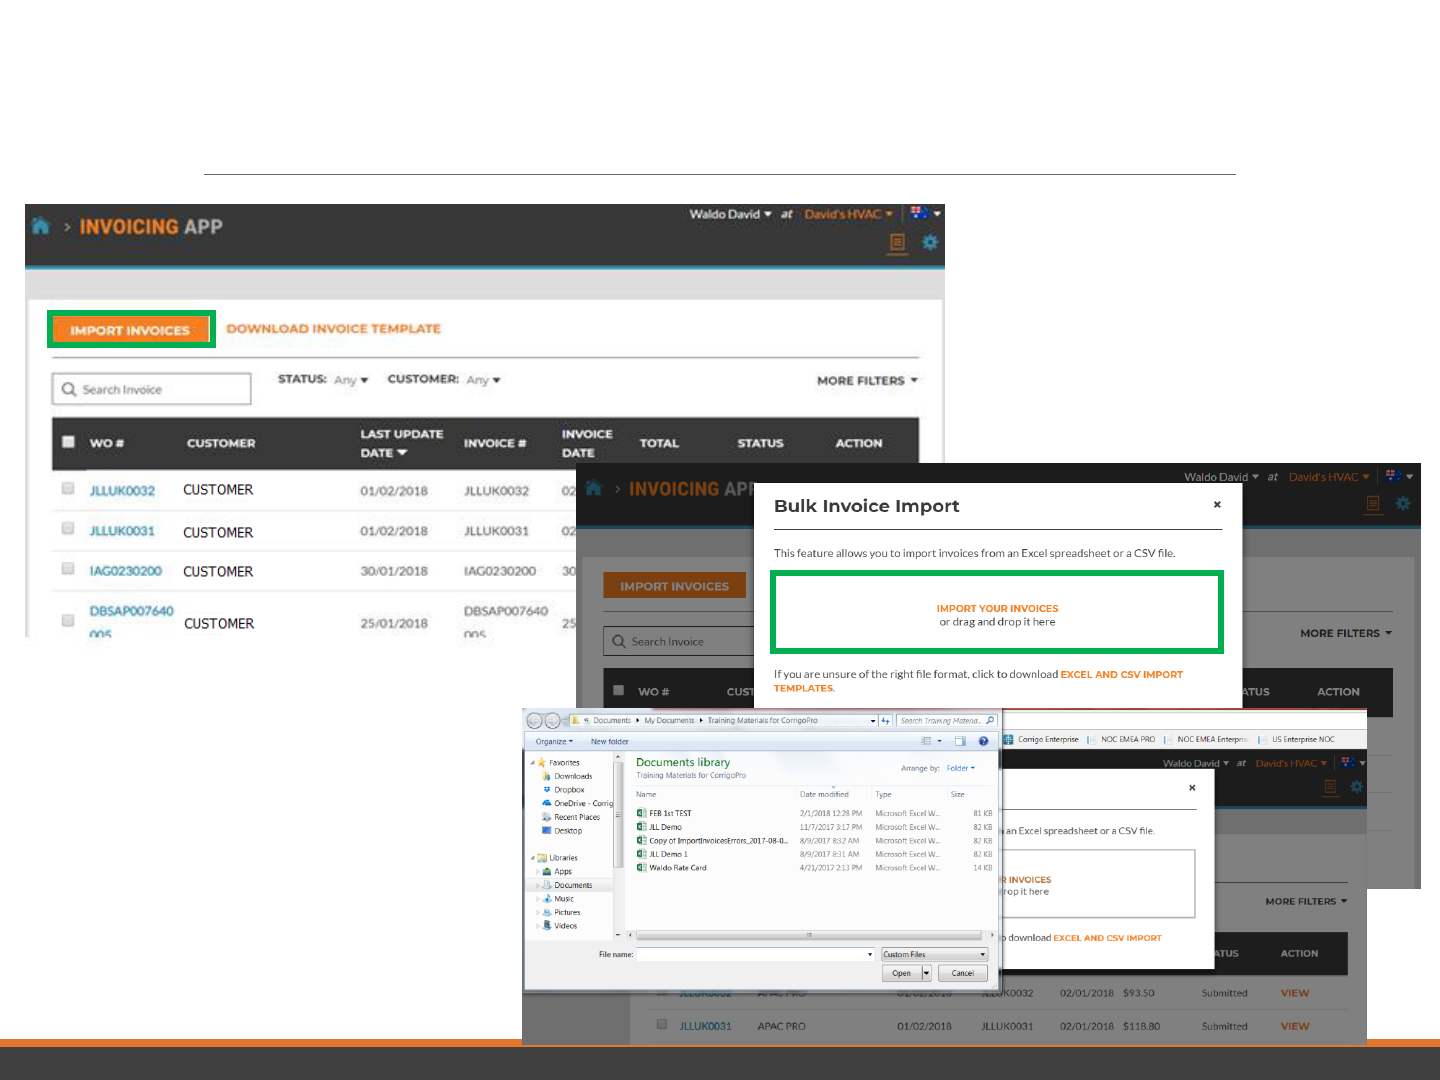
Invoicing App: Importing Invoices
• In the Invoicing App click on
the “IMPORT INVOICES”
button
• “IMPORT YOUR INVOICES” box
will be displayed, shown below
• Click on ”IMPORT YOUR INVOICES”
• A window will open to view your
Documents library
• Click on or drag and drop your
saved import template
• This will start the import process
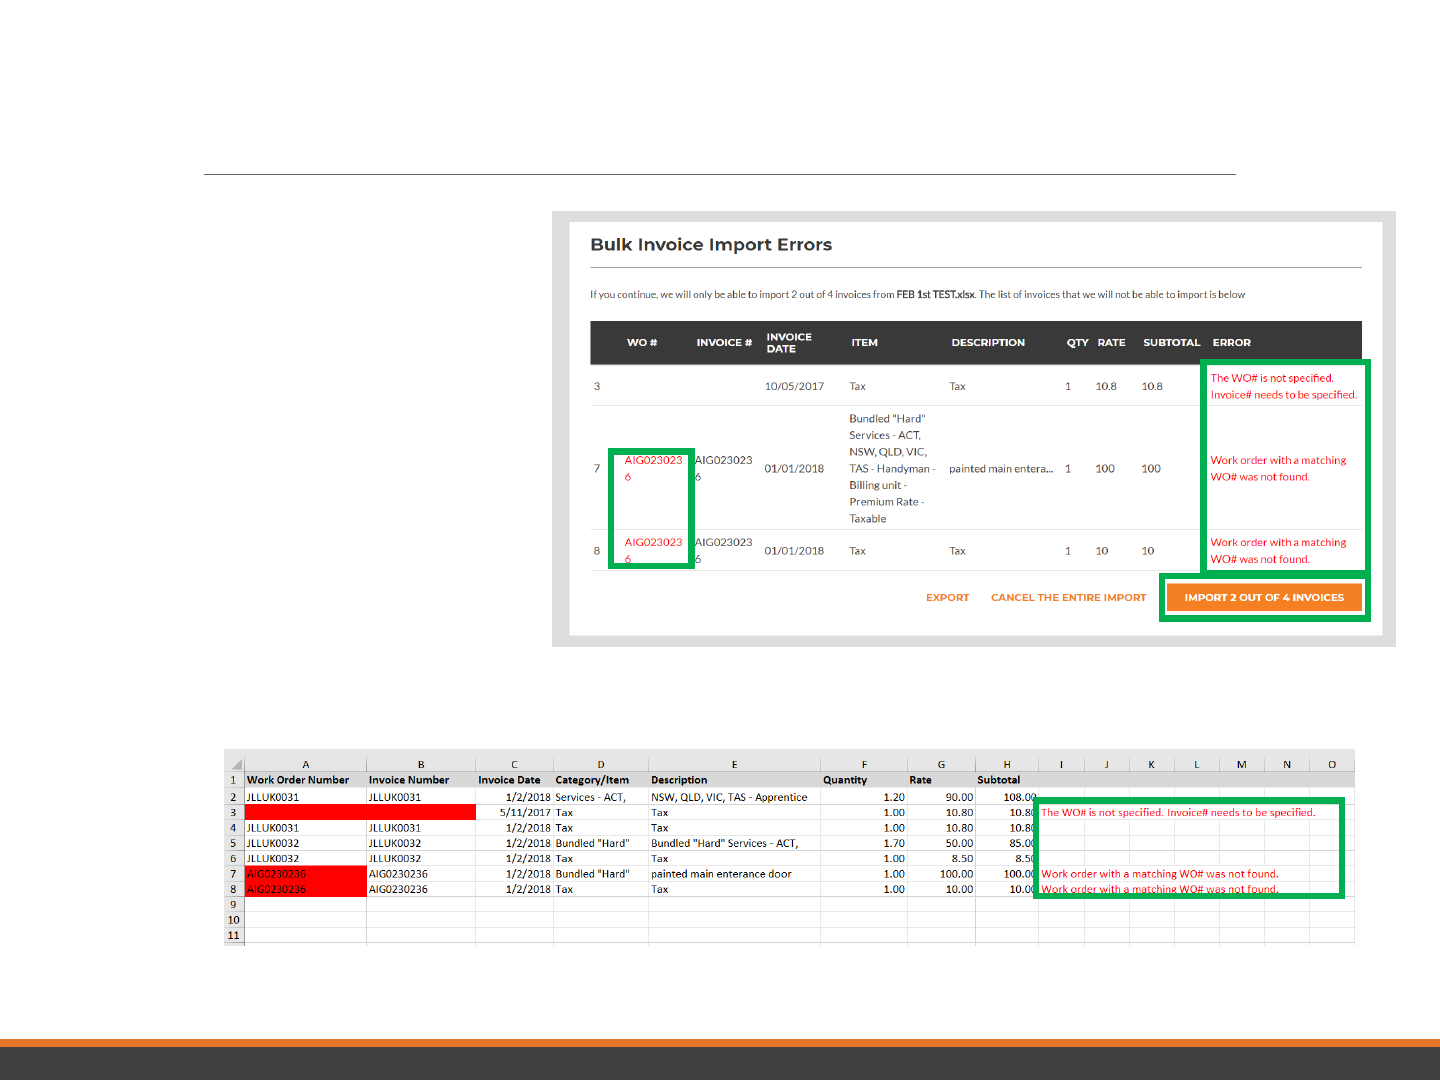
Invoicing App: Bulk Invoice Import
• Data errors are identified by
the system, shown in “red”
• You can go ahead and import
those that are correct
• Or you can cancel and fix
those that need correcting
first
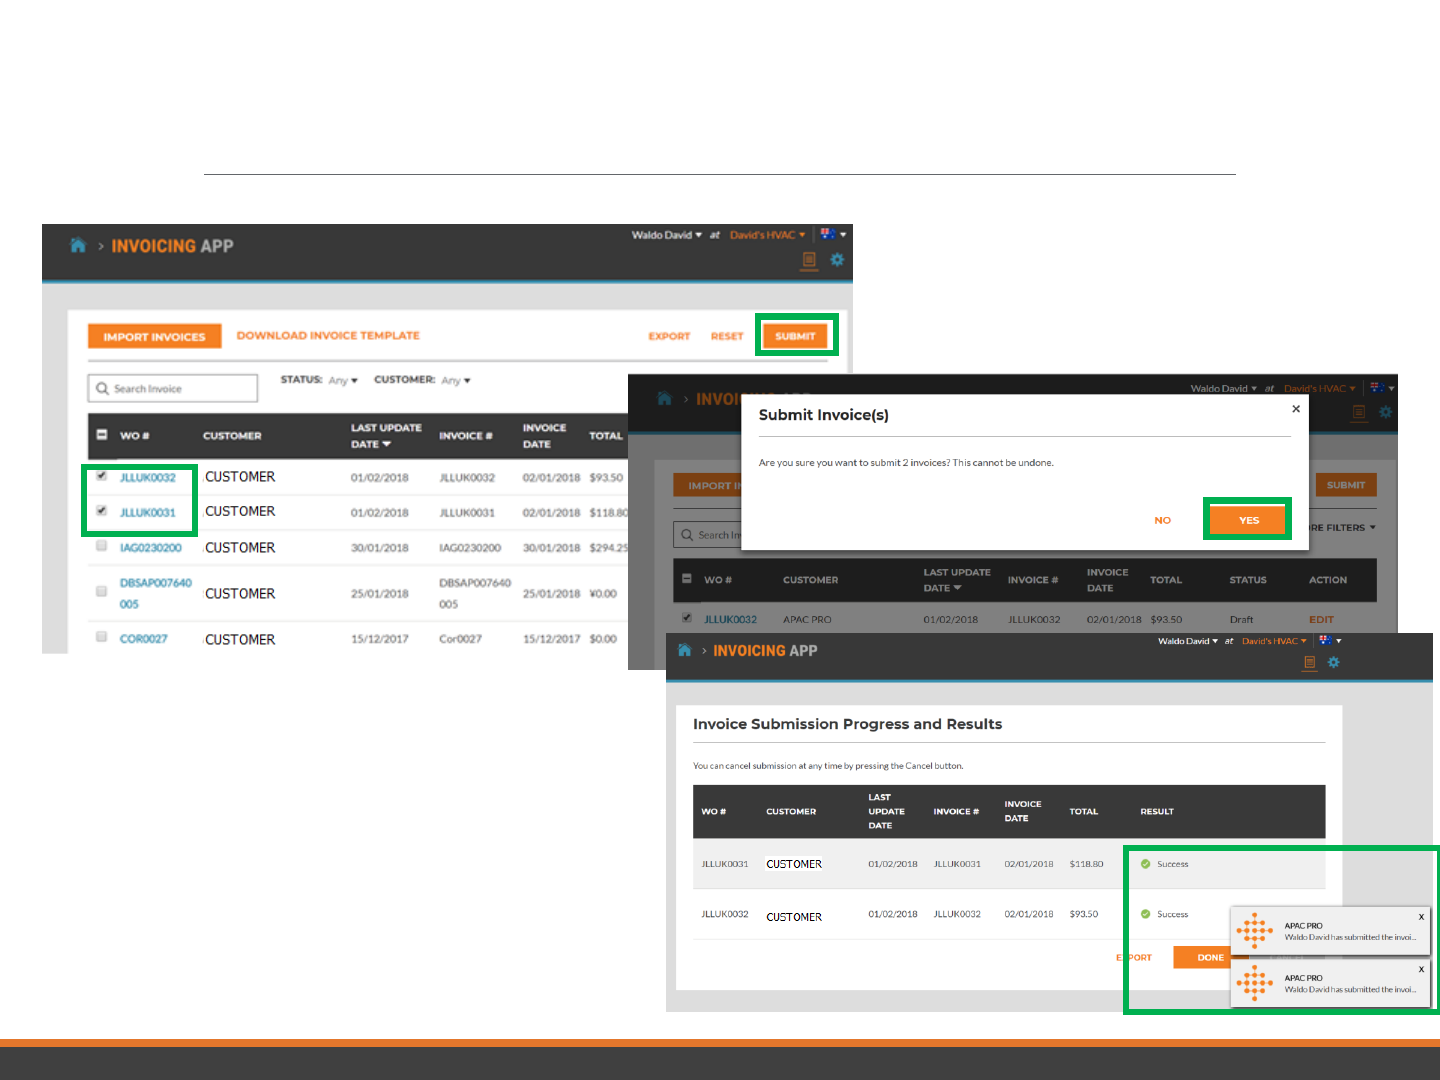
Invoicing App: Submit Bulk Imported Invoices
• Imported invoices can now be submitted for
payment, they will have a check next to
them, shown above
• Click the “SUBMIT“ button
• You are asked if you are sure you want to
submit the invoices, click “YES”
• 2 invoices have been submitted successfully
